Aliases as a secret identity for your inbox

Table of Contents

What's this about?

In this post we’ll learn a quick hack to:

1) Take back control of your inbox.

2) Stop giving out your (main) email address.

3) Stop spam at your discretion.

What is an alias?

We’re going to create an email alias. An alias is an additional email address associated with your main account. Emails sent to that alias still go to your main email box. It’s like a nickname for your email address. Imagine you have a treehouse and you want to let your friends send you messages there. You tell them, “Hey, you can call my treehouse ‘Fort Awesome’ or ‘The Cool Spot’.” Whether they call it by one name or the other, the messages still get to you in the same treehouse. Just like that, an email alias lets people send emails to different names, but they all end up in your main email inbox.

Why would we want to use aliases instead of just using our regular email or plus addressing?

With this trick you can quickly create email addresses with the option of them being as permanent or as temporary as you would like. You will still send and receive emails to your main inbox so from your perspective it’s transparent.

If you ever decide you want to stop receiving emails to that address, instead of having to go through the annoying process of unsubscribing and hoping the other end honors your unsubscribe request, you just disable the alias and *poof* no more emails arriving at that address. Aliases put the control back in your hands.

Better Than Plus addressing

This method is better than plus addressing (eg. hmfic+facebook@here.com) because you can’t stop someone from sending you an email to a plus address. All it does is tell you who is selling your information but it doesn’t give you control.

Deleting an alias stops the sender’s ability to send to that address. 

The good stuff: An example on outlook.com

Steps:

  1. Go to outlook.com
  2. Click on “sign in”
  • Sign in or,
  • Create a new account
  1. Use this link to create an alias: https://go.microsoft.com/fwlink/p/?linkid=864833

It’s best to use something descriptive when you’re creating the alias. Something that will give you a hint what site you intended to use the alias on. I like to use dot suffixes to my email with the name of the site. In this example if my main inbox is “hmfic@outlook.com” I would use the alias hmfic.facebook@outlook.com for my alias when signing up for facebook.

  1. Use that newly created alias to sign up for stuff. This can be used any time you’re asked to put your email in a registration form. Especially if you don’t want that website to have your real email address. Most email providers allow you to do this an unlimited amount of times so personally, I would create a new alias every time I’m asked to give my email address to a website.
  2. When you’re done with that alias and/or don’t want email from that website/email list/whatever, you just go back in and delete the alias. From that point on the sender will not be able to send emails to that address. This won’t impact your main email box. If you accidentally delete the alias or down the road you decide you want to start receiving email at that address again, you can just go back in and add back the same alias. In this way you can turn on and off your email at will!

Caveat

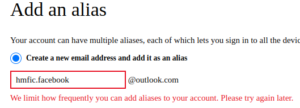
Unfortunately, outlook.com will limit the rate at which you can add aliases.

You can find more information here as well.


Microsoft 365

  1. Using Microsoft 365 is even easier. Especially if you’re using a business account.
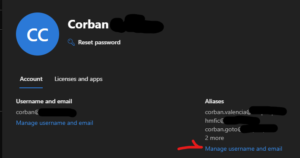
  2.  Log in to admin.microsoft.com
  3. Go to Users > Active Users

  1. Select your user

  1. Under “Aliases” in the slide out select “Manage username and email”

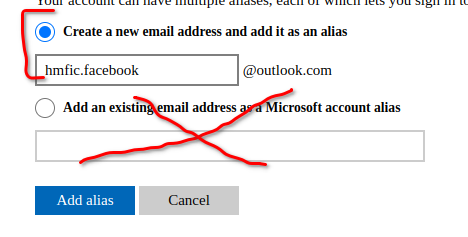
  1. Under “Username” add your alias. Use something descriptive like you would with plus addressing. In this example I’m using “corban.facebook” to designate that this alias is for facebook.

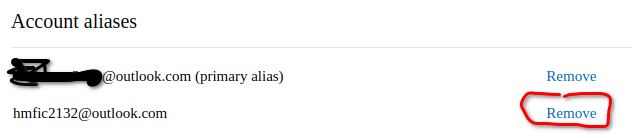
You can use this alias for as little or as long as you’d like, even permanently. You’ll still receive messages to your main inbox and can even reply from them (make sure to enable the “from” field to do so). If you ever want to stop receiving email from facebook just delete it. If you want to start receiving it again, add it back. None of this has to be permanent. It’s up to you and it’s extremely flexible.

A PowerShell script

Here is a link to a PowerShell script that I wrote that lists current aliases and then prompts you to delete an alias or create one.

Have fun!

Share:

More Posts

Send Us A Message